


Poppy Playtime – Chapter 2, titled "Fly in a Web," significantly ramps up the difficulty, puzzles, and horror elements of the first game. Navigating the depths of the Playtime Co. factory requires more than just quick reflexes; it demands a strategic understanding of the new GrabPack mechanics and the patterns of the factory's vengeful toys. This guide provides a step-by-step "how-to" for every major challenge you will encounter.
 1. How to Begin Your Descent into the Factory
Starting Chapter 2 requires you to pick up exactly where the first chapter left off—in the aftermath of freeing Poppy. Your first goal is to reach Elliot Ludwig's office.
Accessing the Initial Areas
After the opening cutscene, follow the linear path until you reach a hallway blocked by barrels. You must physically move these barrels to access the storage closet. Inside, you will find the key to Elliot Ludwig’s office. Enter the office and speak with Poppy; she will eventually lead you toward the Game Station, but a long, pink arm will snatch her away before you can escape.
Restoring Initial Power
To follow Poppy, you must head toward the "Power" door at the bottom of the hole. This introduces the fundamental circuit puzzles of the chapter. You will need to attach your GrabPack hand to a power outlet, wrap the wire around conductive poles to bridge the gap, and hit the receiver to restore power to the Game Station entrance.
2. How to Obtain and Use the Green GrabPack Hand
The Green Hand is the most critical tool added in Chapter 2. Unlike the Blue and Red hands, which are permanent fixtures, the Green Hand allows you to store an electrical charge for exactly ten seconds.
Navigating the Molding Room
To get the Green Hand, you must enter the Molding Room. The process involves a multi-step machine sequence:
- Pull the main power lever.
- Activate the buttons in order (Droplet icon, then the subsequent flashing red buttons).
- Fix the broken pipe behind the machine.
- Go upstairs to retrieve a green paint can and load it into the machine.
- Return downstairs to finish the process and retrieve the hand from the conveyor belt.
Mastering Electrical Transfer
Once you have the Green Hand, you must learn to "take and give" power. Shoot the Green Hand at a glowing green power node to absorb the charge. Your hand will glow green, and a timer will start. You must then shoot the charge into a deactivated node within ten seconds to open doors or power machinery.
3. How to Win Musical Memory Against Bunzo Bunny
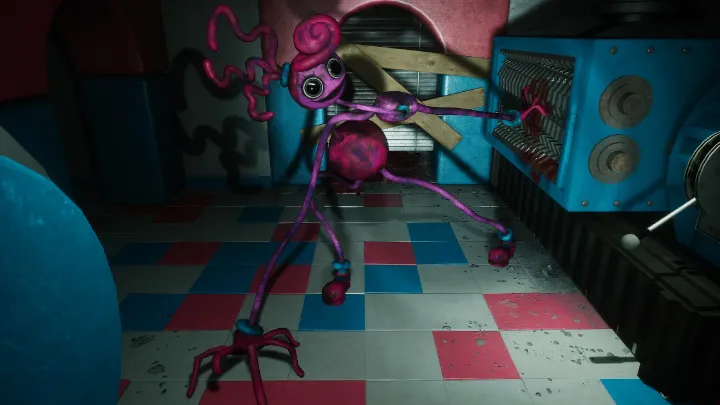
The first game Mommy Long Legs forces you to play is "Musical Memory," a lethal version of Simon Says or Bop It. Your opponent is Bunzo Bunny, a cymbal-clapping rabbit that slowly descends toward you.
Understanding the Sequence Rules
Colors and symbols will flash on the screens around you. You must hit the corresponding colored buttons on the circular platform in the exact order shown. As the rounds progress, the game adds more buttons, including a "Violet" button behind you and several distracting symbols (Circle, Square, Triangle, etc.).
Strategies for the Impossible Round
By the final round, the sequence becomes too fast and complex for human memory. The "Cease" button (represented by a ⚠ symbol) will begin spinning around the room. How to win: You do not need to finish the sequence. Instead, focus on tracking the Cease button and hit it as soon as it appears to break the game and end the round.
 4. How to Survive the Whack-a-Wuggy Challenge
The second game takes place in a dark room filled with pipes. Small, multi-colored versions of Huggy Wuggy will emerge from these holes to attack you.
Prioritizing the Growls
The most effective way to survive this mode is to use audio cues. While the Mini-Wuggys enter silently, they will emit a distinct growl or "cricket" sound right before they lung at you. You have roughly five to ten seconds to whack them back into their hole once they growl.
- Headphones: Essential for pinpointing which pipe the growl is coming from.
- Brightness: Crank your in-game brightness to the maximum to see their yellow hands in the dark pipes more easily.
Positioning and Movement
Stay in the center of the room. Moving to a corner creates blind spots that make it impossible to see all the pipes at once. Keep your camera moving in a 360-degree rotation to check all heights and angles constantly.
5. How to Navigate the Statues Obstacle Course
The third game is "Statues," featuring the dog-caterpillar hybrid PJ Pug-a-Pillar. This is a high-stakes version of "Red Light, Green Light."
Movement Timing
You can only move through the obstacle course when the lights are off and music is playing. When the lights turn on, you must stop moving immediately. PJ Pug-a-Pillar does not follow these rules; he will crawl toward you constantly, regardless of the lights.
- Plan your route: Look for the most direct paths through the playground equipment.
- Use the GrabPack: There are grapple points that can help you clear obstacles faster, but ensure you aren't mid-air when the lights come back on.
The Escape Shortcut
Toward the end of the course, you will reach a glass window overlooking a control room. Rather than finishing the course normally, you must use your GrabPack to swing up into the open vent above the window. This is the only way to escape Mommy Long Legs' intended trap.
6. How to Handle the Water Treatment Puzzles
After escaping Statues, you will find yourself in the Water Treatment facility. This area acts as a hub for several complex traversal puzzles.
Aligning the Platforms
You must use the control console to align rotating platforms in the center of the pool. Use the red buttons to rotate them until they form a straight bridge, allowing you to cross into Bay 2. Here, you will encounter the "Bunzo Bunny conveyor" puzzle.
H3: Building the Bunzo Toy
To proceed, you must gather parts for a Bunzo Bunny toy to satisfy a machine lock:
- Locate and press the colored buttons scattered around the room to activate the assembly line.
- Ensure the conveyor belt brings the toy to the scanner at the exit.
- While waiting, use the Green Hand to transfer power to the various shutters that block your path.
7. How to Escape the Final Mommy Long Legs Chase
Once Mommy Long Legs realizes you have cheated her games, she enters a "Deranged" state and begins a relentless final hunt through the factory's industrial basement.
The Furnace Room Strategy
You will eventually reach a furnace room where you must forge a gear to unlock a gate.
- Find the red cog on the shelves.
- Carry it to the second floor of the furnace and load it.
- Crucial Step: Ensure the furnace doors are wide open before you leave. This sets up the trap for the final confrontation.
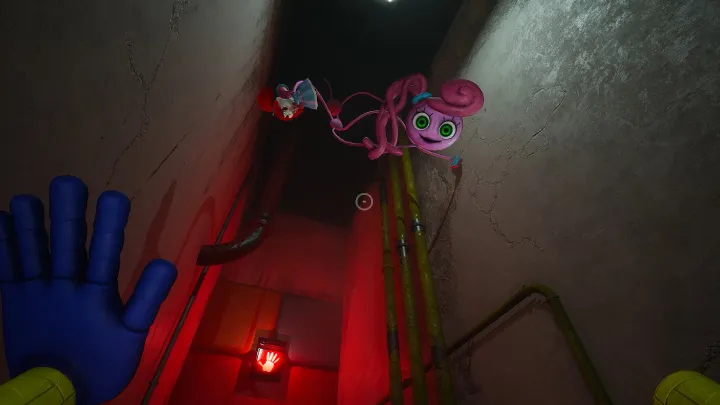
Navigating the Vents
During the chase, Mommy will send her arms through the vents to grab you. Stay away from the center of the pipe and hug the walls. When you see her reach in, stop or back up slightly until her arm retracts, then sprint past.
8. How to Defeat Mommy Long Legs
The final showdown takes place in a room with a large industrial grinder. You cannot defeat her with traditional combat; you must use the environment.
Triggering the Grinder
Once the chase reaches its climax, Mommy will get her hand stuck in the industrial grinder. Look for the lever nearby.
- Step 1: Distract her by moving to the opposite side of the platform.
- Step 2: Quickly reach the lever and pull it.
- Step 3: Watch the cutscene as she is pulled into the machine.
The Prototype's Appearance
After her death, a large metallic claw (Experiment 1006, The Prototype) will reach from under a door to drag her remains away. Do not attempt to interact with it; simply wait for it to disappear so you can proceed to the final train station.
 9. How to Operate the Train and Finish the Chapter
The final challenge is a simple logic puzzle involving the train you've been trying to reach the entire game.
Inputting the Codes
Throughout the three games, you were given pieces of a train code. Look at the console in the train’s cockpit. You must pull the levers and press the symbols in the specific order given to you:
- Color sequence.
- Symbol sequence.
- Number/Position sequence.
The Sudden Brake
As the train gains speed, Poppy will reveal her true intentions and switch the tracks. You will eventually be prompted to "Pull the Brake." Interact with the emergency lever repeatedly until the train crashes, ending the chapter and leading into the events of Chapter 3.
10. General Survival Tips and Tricks
Mastering Chapter 2 requires a specific mindset and attention to detail that the first chapter didn't fully demand.
- Listen to VHS Tapes: Tapes found throughout the factory often provide clues for puzzles or warnings about monster behavior. For example, the Red Tape explains the staff's fear of a "spider," foreshadowing Mommy Long Legs.
- Manage Your 10 Seconds: When using the Green Hand, always look at your target node before you grab the power. Aiming while the timer is ticking often leads to failure and death.
- Inventory Management: While you don't have a traditional inventory, knowing which hand (Red, Blue, or Green) is equipped at all times is vital for survival during the high-speed chase sequences.
Conclusion
Surviving Poppy Playtime – Chapter 2 is a journey through memory, speed, and environmental awareness. By mastering the 10-second Green Hand mechanic, staying calm during the high-pressure mini-games of the Game Station, and successfully baiting Mommy Long Legs into the furnace room, you can navigate the horrors of Playtime Co. and reach the train. The chapter’s end marks a major turning point, shifting the focus from escape to a deeper, more dangerous mystery within the "Playcare" sector.